01 09 10

Sunday, September 25, 2011

Our Spooktaular collection is Here!

Happy Monday!
The wait is finally over ... our new Halloween and Autumn handmade ornament collection is up online for all to enjoy. Much like your trick or treat candy, make sure you get your orders in quick because these sweet little designs won't last long.

Here are some close up shots of our designs because the real beauty is in the details.
Good luck and let us know what you think of our latest designs.


Friday, September 16, 2011

Swirling in Celebrate 365 Magazine


We were so thrilled to been asked to submit a few of our new Halloween ornament designs for the upcoming double issue of Celebrate 365 magazine. This issue will combine late summer with Halloween designs for everyone's enjoyment.

The two swirlies that were chosen were our Candy Corn Owl and our Sweet Little Candy Corn Witch. Both of these sweet little swirly designs are perfect to celebrate the upcoming Halloween season and will be available online on September 26th along with the rest of our new Halloween/ Autumn collection. And to order a copy of Celebrate 365 magazine check out Connie's website here.


Enjoy your weekend, When do you start decorating for Halloween?

Sunday, September 11, 2011

Halloween Collection update


As we add the finishing touches to this years new Halloween/Autumn ornament collection, we also have updated our homepage. So we can finally announce a launch date. Drumroll please.......

MONDAY SEPTEMBER 26th

It's official! It's in writing....So mark your calendars, program your phone reminders... whatever, but make sure you get a chance to check out this years collection of 15 new spooktacular designs.

Most of this years designs were inspired by the Halloween candy icon the candy corn. This little yummy treat and it's seasonal colors of white, orange & yellow (some cases we used brown instead of yellow) are showcased in our designs. We also have some spooky designs as well as a few Autumn/Thanksgiving pieces.

Be sure to sign up for our email list so you can be one of the first people notified when the collection is online. All our collections are limited quantities and sell out quickly and we thank all of our wonderful followers for that.

See you the 26th

Friday, September 9, 2011

Check out our Tweet little shadow box


We thought we would share with you a quick little project we did this week for a friends daughters 3rd birthday gift using one of our swirly ornaments.

Our friend really liked our Swirly birds ornament we created for our Spring collection. Unfortunately we sold out of the designs before she could order one. So we told her we would create another one. By the time we got around to creating a new one, her little girls birthday was coming up. Perfect we thought, we can create a cute shadow box so she can hang it in her room all year long. It's very simple and with a few supplies you too can create this tweet little shadow box.


We picked up a simple white shadow box frame at our local craft store along with a piece of scrapbook paper, some paint, embellishments & tissue paper. Take the frame apart and set the glass aside until your done. Use the background cardboard of the frame as a template for your scrapbook paper. We used Mod Podge to glue the paper to the cardboard. Then we dry brushed with white paint over the scrapbook paper to dull down the pattern a little.


We then cut up small rectangle and square shapes out of tissue paper.


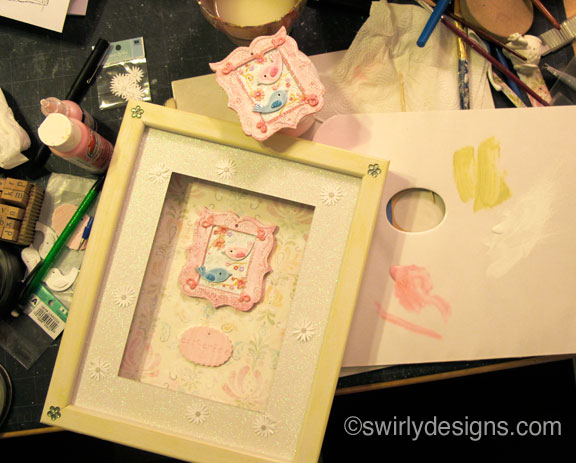
Using Mod Podge again, we glued the tissue on the top and bottom of the frame for a punch of color . Then we painted a light green wash around the front and two sides of the frame.


The shadow box came with a thin piece a paper for the frame mat. You can use that paper as a template on a piece of really nice decorative paper. We picked a metallic white glitter cardstock and embellished it with paper flowers.


The creativity is endless when decorating your frame. Just remember you want to make sure the frame compliments your artwork/ornament and not competes with it.


The frame is now complete and all that is left is hot gluing the ornament to the background. Assemble the frame and hang it on your wall!

We hope Catherine will enjoy this for years to come. Happy Birthday!
~Lianne & Paul
Related Posts Plugin for WordPress, Blogger...