View the Easter collection here!
Showing posts with label easter eggs. Show all posts
Tuesday, March 24, 2015
Friday, April 18, 2014
Revisit these fun Easter Tutorials
Easter isn't until Sunday, so that means you still have two full day of crafting. We thought we would revisit these two very popular Easter tutorials. Our Mini Swirly Bunny how-to is one of our most pinned project on Pinterest.
Creating these Egg Carton Baskets is a wonderful project and a way to recycle all
those extra egg cartons from your Easter egg decorating.
Happy Easter!
Labels:
baskets
,
diy
,
easter
,
easter eggs
,
how-to
,
seasonal how-to
,
swirly bunny
,
Swirly Designs
,
tutorials
Thursday, March 27, 2014
An EGG~cellent Treat for TWO!
To enter visit and leave a comment on the giveaway post on
Swirly Designs Facebook page before Tuesday April 1st at 11:59 pm.
To double your chances enter on the
Polyform Products Facebook page.
You can find the How-to of this project on the sculpey website!
Two random winners will be chosen and announced on
Wednesday, April 2nd, 2014
Your Easter Treats will be sent to you just in time for Easter!
Swirly Designs Facebook page before Tuesday April 1st at 11:59 pm.
To double your chances enter on the
Polyform Products Facebook page.
You can find the How-to of this project on the sculpey website!
Two random winners will be chosen and announced on
Wednesday, April 2nd, 2014
Your Easter Treats will be sent to you just in time for Easter!
Hop to it!
Labels:
contest
,
easter eggs
,
egg cup bunny
,
Giveaway
,
holiday how-to
,
polyform products
,
Swirly Designs
Wednesday, March 26, 2014
Holiday How-to Easter: Egg Cup Bunny
The Easter season is in full swing, even if the weather is still holding out on us.
We are eager and egg~cited to share with you our new Sculpey & Swirly Holiday How-to project for Easter.
How cute are these Egg Cup Bunny? We've created a unique way to display your beautifully decorated eggs this season. You can find the how-to here on the Polyform Products website.
We are eager and egg~cited to share with you our new Sculpey & Swirly Holiday How-to project for Easter.
How cute are these Egg Cup Bunny? We've created a unique way to display your beautifully decorated eggs this season. You can find the how-to here on the Polyform Products website.
Once you try this project you won't be able to stop at just one. We have our own bunny colony of
Egg Cup bunnies here at the studio. ;-)
Let your creativity blossom with the possibilities. Try different clay color combination; experiment with fun patterns and textures.
Not only can you use them to display your festive Easter eggs, but these Egg Cup Bunnies make wonderful place card holders for your Easter brunch or fill plastic eggs with candies for a
special treat for the kids.
If you like this project and want to keep seeing Swirly Designs create more, be sure to visit Polyform Products facebook page and share your thoughts. You can also visit our Swirly Designs Facebook page and share your feedback and share pictures of your finished Egg Cup Bunny.
Enjoy the Swirly Easter Season!
xo Lianne & Paul
Enjoy the Swirly Easter Season!
xo Lianne & Paul
This project is for personal, non-commercial use ONLY.
Labels:
easter
,
easter eggs
,
egg cup bunny
,
holiday how-to
,
polyform products
,
sculpey
,
swirly bunny
,
Swirly Designs
Friday, March 15, 2013
Holiday How-to Easter: Bunny Egg Treat Box
The two of us here at Swirly Designs are so happy to be working again this year with Polyform Products. Together we can share with you some wonderful seasonal how-to projects. Our first
project this year is one of our personal favorites. You can create this really sweet and practical
Bunny Egg Treat Box. Find the how-to here. You can fill it with special
treats for your kids basket, add it to your holiday centerpiece or even
make it the golden prize for your annual egg hunt.
The clay used in this project is called Model Air, air dry clay from Polyform. If you haven't tried it, we would really recommend experimenting with it. It's perfect for this type of project because you don't have to cook your piece and worry about the papier mache egg in your oven. But it is a lot more messier than we are used to working with since we mostly have worked with a cleaner clay like Premo for our own designs. That did take a little time getting use to. We kept a spray bottle and roll of paper towels with in hands reach so we could keep our hands clean.... but you know it's good to get messy especially when you're in your creative groove.
Our project shows how to make feet for your bunny egg, but we also created a few without feet. On those we just decoupaged the bottom half of the egg with colored tissue paper, paint mini flowers and added a dusting of glitter. These work great to compliment your footed bunny. They also work if you plan on keeping them in a basket because they tend to be a little top heavy and roll over without the feet support.
Let your creativity go crazy and paint your bunny to fit your own holiday decor.
These are all the versions of the bunny egg we created for this how-to project. Once we made one they just started muiltiplying. :-)
The bigger the papier mache egg you choose to use in this project the more treats they can hold.
If you like this project and want to keep seeing Swirly Designs create more, be sure to visit Polyform Products facebook page and share your thoughts. You can also visit the Swirly Designs facebook page and share your feedback and share pictures of your finished Bunny Egg Treat Box.
Have a fun and Swirly Easter!
xo Lianne & Paul
This project is for personal, non-commercial use ONLY.
Labels:
easter
,
easter eggs
,
holiday how-to
,
how-to
,
polyform products
,
sculpey
Tuesday, April 3, 2012
Friday, March 23, 2012
Holiday How-to: Easter Egg Dioramas

Easter is truly one of our favorite holidays to design for. And also to decorate for as well (shh don't tell the other holidays!) Even though Easter this year is very early, it didn't stop us from collaborating on another Seasonal how-to project with Polyform. This time with this egg~cellent Egg Diorama, which you can find the steps on their website. Perfect project to celebrate the spring season!
It is always so fun creating and designing these seasonal how-to projects. We get so involved and sometimes carried away with the many ideas and possibilities for each project that we have to really edit ourselves! It must be our design and illustration training that we try to create many different solutions for the project. That said, the above photo shows three (we forced ourselves to stop at three) designs we offered for this egg diorama how-to. Scupley decided the Chocolate Bunny Egg Diorama was the one they wanted for their website.

Chocolate Bunny Egg

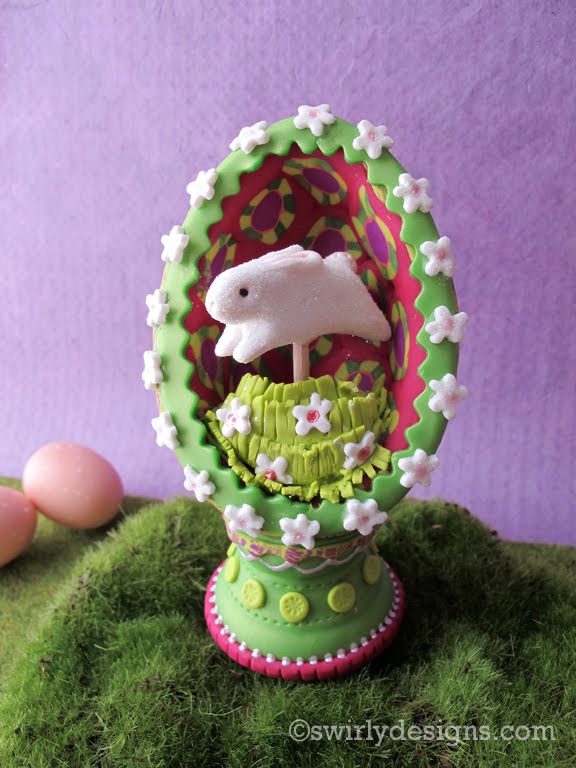
We were so happy with how they all turned out we thought we would share with you the two other eggs solutions. The Hopping White Bunny Egg and the Jelly Bean Chick.

Hopping White Bunny
In spring color tones of greens and pinks, our little white glittery bunny is hoping through the field of flowers.

Jelly Bean Chick
What's Easter without the sweets? This little chick is sitting pretty in his basket surrounded by a mound of yummy jelly beans.

The real beauty of this kind of project is the endless possibilities for creating and adding your own style once you learn the basics steps.
Have fun and Happy Easter!
Lianne & Paul
This project is for personal, non-commercial use.
Labels:
easter
,
easter eggs
,
holiday how-to
,
how-to
,
polyform products
,
sculpey
Saturday, April 23, 2011
What do you do on Easter Eve?
We craft of course!
It's the day before Easter and the weather today was just rainy and dreary. All our outside Easter activities were canceled so we decided to spend some time in the studio. Noticing all the empty egg cartons around the studio from our egg decorating we just had to think of something to do with all them and this is what we came up with.....

These petite little egg carton baskets with pipe cleaner handles....
how cute are these?

You can fill them with treats for your guests or use them
for place card holders for your Easter brunch.

They also make nice egg displays for that egg-stra special egg
you colored this week.

Our mini Swirly bunny loves her new home.

Even hang them on your Easter egg tree to greet your guest.

This basket is embellished with a glitter bunny made from
a Martha Stewart punch.

the possibilities are endless.
We want to wish all of you and your families a
most eggcellent Easter Sunday!
~Lianne & Paul
It's the day before Easter and the weather today was just rainy and dreary. All our outside Easter activities were canceled so we decided to spend some time in the studio. Noticing all the empty egg cartons around the studio from our egg decorating we just had to think of something to do with all them and this is what we came up with.....

These petite little egg carton baskets with pipe cleaner handles....
how cute are these?

You can fill them with treats for your guests or use them
for place card holders for your Easter brunch.

They also make nice egg displays for that egg-stra special egg
you colored this week.

Our mini Swirly bunny loves her new home.

Even hang them on your Easter egg tree to greet your guest.

This basket is embellished with a glitter bunny made from
a Martha Stewart punch.

the possibilities are endless.
We want to wish all of you and your families a
most eggcellent Easter Sunday!
~Lianne & Paul
Labels:
easter
,
easter eggs
,
how-to
,
inspiration
,
Martha Stewart
,
ornaments
,
swirly recommends
Friday, April 22, 2011
Easter eggs & crafts with the kids
It's been a busy few weeks around here with school vacation and preparing for Easter, all while we are in the middle of a major reorganizing project in our studio closet (we'll post pictures of that project soon). With Easter only two days away we wanted to squeeze a few fun projects for our little ones this week.

egg decorating:
Always a fun treat and the kids love it but this really requires a lot of preparation ahead of time if you want to do the really fancy stuff so we just stuck to the basics. We had approx 5 dozen eggs - half of them boiled while the other half were blown out.

Our little guy always prefers his hands for dipping the eggs instead of the wire holders.

Our two year old got the hang of it very quick and then became very bored with the whole thing.

The white eggs turned into colored eggs very quickly!

Letting the eggs drip dry on a styrofoam piece with tooth picks works really well. We got the idea from a similar one we found on the Martha Stewart site.


Craft projects:
Today we spent the morning doing some quick craft projects. Our two and our five year old's attention span for doing craft projects is very limited these days, so the faster the project is the better.

We made paper eggs and painted them with water colors and dot markers.

This fun paper bag birds nest idea from Family Fun magazine was a perfect quick project for the kids. We spent some time outside collecting branches in the yard and glued them on a crumpled up paper bag.


it's another way to display your painted eggs.

How funny are these little bunnies! Using a white paper bag, some googly eyes, white and pink felt, stickers and pom poms (for the tail) you can make your own cute bunny puppet!
Happy Easter Crafting!!

egg decorating:
Always a fun treat and the kids love it but this really requires a lot of preparation ahead of time if you want to do the really fancy stuff so we just stuck to the basics. We had approx 5 dozen eggs - half of them boiled while the other half were blown out.

Our little guy always prefers his hands for dipping the eggs instead of the wire holders.

Our two year old got the hang of it very quick and then became very bored with the whole thing.

The white eggs turned into colored eggs very quickly!

Letting the eggs drip dry on a styrofoam piece with tooth picks works really well. We got the idea from a similar one we found on the Martha Stewart site.


Craft projects:
Today we spent the morning doing some quick craft projects. Our two and our five year old's attention span for doing craft projects is very limited these days, so the faster the project is the better.

We made paper eggs and painted them with water colors and dot markers.

This fun paper bag birds nest idea from Family Fun magazine was a perfect quick project for the kids. We spent some time outside collecting branches in the yard and glued them on a crumpled up paper bag.


it's another way to display your painted eggs.

How funny are these little bunnies! Using a white paper bag, some googly eyes, white and pink felt, stickers and pom poms (for the tail) you can make your own cute bunny puppet!
Happy Easter Crafting!!
Labels:
crafting with the kids
,
easter
,
easter eggs
,
family
,
kids
Saturday, April 3, 2010
Easter Egg painting with the kids
What's Easter without decorating eggs! Easter falls so early this year and with all the craziness around the studio lately, we wanted to make sure we set aside some time to decorate eggs with the kids. Our four year old really enjoys and our almost one-year old just enjoys watching.
.
This picture came out so cool with the steam from the boiling water

We prepared 4 dozen eggs. Half of them we blew out and the other half we boiled.

experimenting with a wax crayon on an egg.


These eggs came out so cool! We have learned to let the little one take the lead and just let him have fun instead of trying to art direct him. I guess that's what you get when you have two artists for parents.


Hope your Easter is an Eggcellent one!
- Lianne & Paul
.

This picture came out so cool with the steam from the boiling water

We prepared 4 dozen eggs. Half of them we blew out and the other half we boiled.

experimenting with a wax crayon on an egg.


These eggs came out so cool! We have learned to let the little one take the lead and just let him have fun instead of trying to art direct him. I guess that's what you get when you have two artists for parents.


Hope your Easter is an Eggcellent one!
- Lianne & Paul
Labels:
easter eggs
,
holiday
,
kids
,
Photos
Subscribe to:
Posts
(
Atom
)