Tuesday, August 31, 2010
Make more room...Here they come....
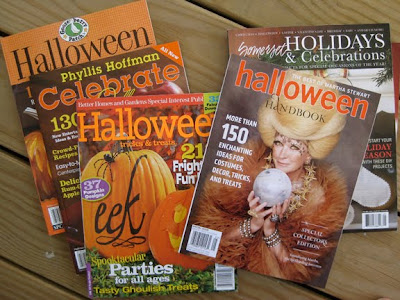
The one true sign to tell that the Holiday season is quickly approaching here at the studio, is not the changing of the weather, not that we must trade in our flip flops for cozy warm slippers... nope, it's the slew of new Holiday magazines that grace the newsstands and our mailbox.
We are like a couple of school kids giggling at the sight of these eye candy delights.They are chock full of fun and inspiring ideas that last week alone we picked up 4 new Halloween/Fall issues and 2 new Holiday issues have come in the mail.
We would love to share with you a sneak peak into these issues explaining what we love about each issue, but because of our hectic schedule this won't allow us to just curl up in a cozy chair with a nice cool glass of fresh apple cider and enjoy these fun issues. So for now we will dedicate a shelf here at the studio with a sign that says Don't open until Dec 26th.
Are you as crazy with the Holiday issues as we are? Tell us the issues you read and pick up.
Happy reading!
Labels:
christmas
,
halloween
,
Holiday Crafts Magazine
,
magazine
,
swirly recommends
,
swirly studio
Saturday, August 28, 2010
Halloween in August: All that Glitters
What's an ornament without a little glitter to make it sparkle?
Thinking back to the early days of our ornaments and how they were all glitter free, we now can't imagine them without glitter. We think our designs aren't really finished without that glistening finish.
Of course using glitter is extremely messy. The studio gets covered... we are covered and anyone who comes to visit the studio will always leave with a gift. Lately we've noticed that the kids have that extra sparkle!
When it comes to glitter we must have tried every brand out there looking for the one that has the best sparkle (and believe us not every glitter sparkles the same). We prefer the ultrafine transparent glitter because it will cover the ornament without covering the paint colors. We will occasionally use the color glitter like black, for some of the new Halloween designs. The Martha Stewart Craft Glitters come in such visually appealing beautiful colors that we wish we could incorporate more into our ornaments.
And speaking of Martha... we love her glue pens for glittering our ornaments. (It was our #1 pick Martha craft tool that we blogged about in a past post).
We always take in consideration the placement of the glitter and make sure it makes sense. We think about where and how much glitter we'll use on a design and we don't want to drown the ornament in glitter just because we can. Sometimes too much IS too much!
These little pumpkins are drying after getting their dusting of glitter
Don't these eyes just sparkle.... with fear!
Here is a close up of a pumpkin with transparent glitter. It looks like an orange glitter but it's not.
After all the glitter and embellishment work is done and dried and we are able to handle them, we'll thread each ornament with a sheer ribbon making sure the correct color choice works with each design. This task may sound simple but actually choosing the correct color ribbon can make an ornament pop or the choice could be very distracting. So having lots of color options is helpful for those tricky ornaments that the color choice is not obvious. The picture above shows ornaments that are all ready and waiting to be tied and frayed.
Up next will be our final post from this series.... photographing the collection
Our launch of our new Halloween/Fall 2010 collection is schedule for Monday September 13th. Make sure you have signed up for our mailing list so you'll get the email reminder letting you know the collection is online.
You guys have been very supportive of us over the years which makes us want to push our creative limits to make sure we deliver to you a spoooktacklur collection each and every year.
thanks!
Saturday, August 21, 2010
Halloween in August: Painting
Our studio table has been cleared of all our clay tools so we can make room for our favorite part of the process ... the painting!
We choose to create the ornaments using the white clay because we really want to have total control of the colors we choose to paint the designs, for example...
For this design above, to create this striking green background we mixed anywhere from 3-4 different shades of green and yellows with a generous amount of water to give the design a watercolor effect. We very rarely use paint color straight from the tube. We even will mix a little purple in to the black to give it a little more something rather then straight black. The tricky part of doing it like this is trying to re-create the colors if they dry up or if we need to create more ornaments.
A few years ago we created this chart to keep track of our acrylic paints because every time we would go to the craft store to pick up or check out the paints we could never seem to remember which colors we had. The manufacturers are always adding new names and colors to their lines we could never keep up with all the new colors. Our sign might be a little large and we do get a few odd looks but hey it's better then having 10 bottles of Prairie Green #2310.
We are very happy with how our fall ornaments came as well. This ornament has a full palette of autumn colors.
This spooky little ghost peaking out the window was painted using a glow-in-the-dark paint.
It's a fun element added to our Halloween collection.
Here is our new mini swirly scarecrow wind catcher drying on top of a paint tube.
And what is fall without lots of mini pumpkin wind catchers.
Another paint technique we are experimenting is this one-step crackle effect. You paint this crackle paint over your painted ornament and it cracks giving it an aged look. You brush a lighter color over the crackles and wipe away the excess paint and it will make the cracks more pronounced.
pretty creepy!
Perfect for the Halloween season don't you agree.
~ Up next we'll share the final steps to make this collection complete!
Monday, August 9, 2010
Halloween in August: Wrapping up working in clay
Hope everyone had a wonderful weekend.
We have been very busy around here and are working around the clock to wrap up the new Halloween collection in clay. We thought we would go over a few more items before we get into sharing the painting process with you.
Last week we completed the clay sculpting and all the ornaments have been swirled and baked and each one needs a light sanding and then we wipe off all the dust. Sanding is a very tedious but important step. It allows the paint to adhere to the ornaments better.
We feel we have created a nice collection of ornaments to celebrate the Halloween & Autumn season. We can't wait to show you all. Above is one of our fall designs which shows a tree in the field dropping its colored leaves.
Here is another shot of the swirls being added
Here is the original thumbnail sketch for this designs that we changed a bit after sculpting it in clay. We removed the bird from the tree and added a house in the background. Even though we have pretty tight sketches and ideas in the beginning, we never know where the design will take us once we start sculpting.
We use 12 x 12 cermic tiles (which you can get at a hardware store) to work on because these tiles can go right into the oven to bake and it saves us from handling the ornaments to much so we don't distort the designs.
We picked the shelving unit at Michaels to help us with the many tiles we have around the studio waiting to be swirls and baked. We'll have as many as 12 or so tiles around the studio during a collection and trying to find a safe spot is tricky and this unit seems to be helping out some, by giving a place to store them.
Always trying to stay organized and keep things together we got these boxes (above) to keep all our paper templates and eraser stamps (below) in one place. So if we need to create more of a design we will know where to find them.
Happy sculpting!
Stay tuned for our next post where we will begin working in paint.
Monday, August 2, 2010
Swirling in the new Holiday Crafts Magazine
We here at Swirly Designs are welcoming Christmas early with the new issue of Better Homes and Gardens Creative Collection Holiday Crafts Magazine. We were surprised today while out shopping at Target, that the issue is already out in stores. We are happy to share with everyone how happy we are with how our designs looks! We have been an admirer of the magazine for years as it is always filled with wonderful designers and projects. Now, finally after many email exchanges with the editor, we were able make this years issue.
Pick up a copy today, which will have a how-to instructions for our Swirly-Twirly Snowmen.
** on a little funny side note... below is the image of us that we sent to the magazine to be included along side our how-to piece...Well to Paul's surprise, when he flipped through the magazine, he saw that he was cropped out of the image! Oh well, I guess that's showbiz for you!
Labels:
christmas
,
christmas ornaments
,
Holiday Crafts Magazine
,
magazine
,
process
,
Swirly Designs
Subscribe to:
Posts
(
Atom
)